Pages - Menu

Saturday, February 25, 2012

Shutter Speed


Capturing movement in images is something that many photographers only think to do when they are photographing sports or other fast moving subjects.
While there is an obvious opportunity in sports photography to emphasize the movement of participants – almost every type of photography can benefit from the emphasis of movement in a shot – even when the movement is very small, slow and/or subtle.
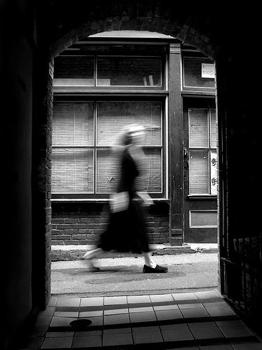
Last week I featured 15 images that capture movement with creative blur – today I want to take a few moments to suggest some tips on how to do it.

Tips for capturing movement:

1. Slow Down Your Shutter Speed
The reason for movement blur is simply that the amount of time that the shutter of a camera is open is long enough to allow your camera’s image sensor to ’see’ the movement of your subject.
So the number one tip in capturing movement in an image is to select a longer shutter speed.
If your shutter speed is fast (eg 1/4000th of a second) it’s not going to see much movement (unless the the subject is moving mighty fast) while if you select a longer shutter speed (eg 5 seconds) you don’t need your subject to move very much at all before you start to see blur.


How long should your shutter speed be? – Of course the speed of your subject comes into play. A moving snail and a moving racing car will give you very different results at the same shutter speed.
The other factor that comes into play in determining shutter speed is how much light there is in the scene you are photographing. A longer shutter speed lets more light into your camera and runs the risk of blowing out or overexposing your shot. We’ll cover some ways to let less light in and give you the option to have longer shutter speeds below.
So how long should your shutter speed be to get movement blur in your shot? There is no ‘answer’ for this question as it will obviously vary a lot depending upon the speed of your subject, how much blur you want to capture and how well lit the subject is. The key is to experiment (something that a digital camera is ideal for as you can take as many shots as you like without it costing you anything).
2. Secure Your Camera
There are two ways to get a feeling of movement in your images – have your subject move or have your camera move (or both). In the majority of cases that we featured in last week’s post it was the subject that was moving.
In this type of shot you need to do everything that you can to keep your camera perfectly still or in addition to the blur from the subject you’ll find that the whole frame looks like it’s moving as a result of using a longer shutter speed. Whether it be by using a tripod or have your camera sitting on some other still object (consider a shutter release mechanism or using the self timer) you’ll want to ensure that camera is perfectly still.
3. Shutter Priority Mode
One of the most important settings in photographing an image which emphasizes movement is the shutter speed (as outlined above). Even small changes in shutter speed will have a big impact upon your shot – so you want to shoot in a mode that gives you full control over it.
This means either switching your camera into full Manual Mode or Shutter Priority Mode. Shutter Priority Mode is a mode that allows you to set your shutter speed and where the camera chooses other settings (like Aperture) to ensure the shot is well exposed. It’s a very handy mode to play with as it ensures you get the movement effect that you’re after but also generally well exposed shots.
The other option is to go with Manual mode if you feel more confident in getting the aperture/shutterspeed balance right.

How to Compensate for Long Shutter Speeds When there is too Much Light

I mentioned above that one of the effects of using longer exposure times (slow shutter speeds) is that more light will get into your camera. Unless you compensate for this in some way this will lead to over exposed shots.
Below I’ll suggest three main methods for making this compensation (note – a forth method is simply to wait for the light to change (ie for it to get darker). This is why many shots that incorporate blur are taken at night or at dawn/dusk):
1. Small Apertures
So how do you cut down the amount of light that gets into your camera to help compensate for a longer shutter speed? How about changing the size of the hole that the light comes in through. This is called adjusting your camera’s Aperture.
If you shoot in shutter priority mode the camera will do this automatically for you – but if you’re in manual mode you’ll need to decrease your Aperture in a proportional amount to the amount that you lengthen the shutter speed.
Luckily this isn’t as hard as you might think because shutter speed and aperture settings are organized in ’stops’. As you decrease shutter speed by a ’stop’ you double the amount of time the shutter is open (eg – from 1/250 to 1/125). The same is true with Aperture settings – as you decrease the Aperture by one stop you decrease the size of the shutter opening by 50%. This is great because an adjustment of 1 stop in one means that you just need to adjust the other by 1 stop too and you’ll still get good exposure.
2. Decrease Your ISO
Another way to compensate for the extra light that a longer shutter speed lets into your camera is to adjust the ISO setting of your camera. ISO impacts the sensitivity of your digital camera’s image sensor. A higher number will make it more sensitive to light and a lower number will make the sensor less sensitive. Choose a low number and you’ll find yourself able to choose longer shutter speeds.
3. Try a Neutral Density Filter
These filters cut down the light passing through your lens and into your camera which in turn allows you to use a slower shutter speed.
It is sort of like putting sunglasses on your camera (in fact some people actually have been known to use sunglasses when they didn’t have an ND filter handy).
For instance, if you’re shooting a landscape in a brightly lit situation but want a shutter speed of a second or more you could well end up with a very over exposed image. A ND filter can be very helpful in slowing the shutter speed down enough to still get a well balanced shot.
It is the use of ND filters that enabled some of the shots in our previous post to get a lot of motion blur while being taken in daylight.
Another type of filter that can have a similar impact is a polarizing filter. Keep in mind however that polarizers not only cut out some light but they can impact the look of your image in other ways (ie cut out reflection and even change the color of a sky – this may or may not be the look you’re after).
Two More Technique to Try – one more technique to experiment if you’re wanting to capture images with motion blur is to experiment with Slow Sync Flash. This combines longer shutter speeds with the use of a flash so that elements in the shot are frozen still while others are blurry. Read more about Slow Sync Flash. Another technique worth trying out is panning – moving your camera along with a moving subject so that they come out nicely in focus but the background blurs.


Read more: http://www.digital-photography-school.com/how-to-capture-motion-blur-in-photography#ixzz1OHpYjVJo
Shutter Speed: A Beginner's Guide


I've always believed that in photography, you should avoid getting bogged down in the technical side of your hobby, and focus on developing your creative talent. However, there are certain technical elements that are essential to getting a good photo - shutter speed is one of them.
Shutter speed is 1 of the 3 elements (along with aperture and ISO speed) that determine a photo's exposure. It also controls how sharp your photos are, and lets you introduce lots of interesting creative effects into your shots. Let's look at what it is, why it's important, and how you can use it.
Train blurred as it goes by
Shutter speed is an essential tool in photography and well worth learning. Image by Mikel.

What is Shutter Speed?

Inside your camera, directly in front of the sensor, is a small flap called the shutter. When you take a photo, this opens and closes to let light reach the sensor, creating your image. Shutter speed describes how quickly or slowly the shutter opens and closes again.
A fast shutter speed means that the shutter is only open for a short period of time; a slow shutter speed means the shutter is open for longer.

How is Shutter Speed Measured?

Shutter speeds are measured in seconds, or fractions of a second. For example, a shutter speed of 1/100 means 1/100th of a second, or 0.01 seconds. This is also known as the "exposure time", because it's the amount of time the sensor is exposed to light.
Most cameras offer a wide range of shutter speeds, starting at just a few thousandths of a second and going up to several seconds. SLRs also have a "Bulb" mode where you can hold the shutter open for as long as you want.

Choosing the Best Shutter Speed

In automatic mode, your camera will try to guess the best shutter speed to capture your scene. Unfortunately it doesn't always get it right, and your photo can end up poorly exposed or blurred.
A better option is to switch to manual mode and take control of shutter speed yourself. When doing so, you need to consider the following:

Camera Shake

Camera shake occurs when hand-holding your camera. No matter how steady you think you are, you can never stand perfectly still, and this slight movement shows up in your photos as a blurriness or lack of sharpness.
Photo blurred by camera shake
Camera shake occurs when hand-holding your camera, and causes blurring of stationary objects. Image by Dean Ayres.
You can avoid camera shake by using a faster shutter speed. It's more noticeable when using lenses with a long focal length, so the longer the lens, the more you'll need to increase your shutter speed to avoid camera shake.
As a rule of thumb, you should use a minimum shutter speed of 1/focal length. So for a 200mm lens, use a shutter speed of at least 1/200th. When calculating this, use your lens's effective focal length, which is found by multiplying the focal length by your camera's crop factor.

Motion Blur

Motion blurring happens when you're photographing a moving subject, let's say a runner. If you use a slow shutter speed, the runner will move across the frame while the shutter is open, causing them to appear as a blurry streak in the final image.
Moving car blurred by a slow shutter speed
Use a fast shutter speed to eliminate motion blur, or use it creatively to convey movement and speed. Image by Ondra Soukup.
You can avoid motion blur by using a faster shutter speed. Doing so means that the subject will move less while the shutter is open, reducing the blurring effect. With a fast enough shutter speed, this blurring becomes unnoticeable, and the action appears "frozen".
But before you go cranking your shutter speed as high as you can, you should consider whether you actually want to eliminate motion blur. It's an excellent way to convey speed or movement in a scene. You can also pan your camera to keep the subject sharp and blur the background.

Exposure

You also need to make sure that your scene is properly exposed. A slower shutter speed lets in more light, while a faster shutter speed lets in less. You need to choose a shutter speed that lets in just the right amount of light, to give a photo which isn't too bright (overexposed) or dark (underexposed), and which has a good level of detail in the most important areas.
Perfectly exposed photo of boats on a beach
Choosing the right shutter speed is important in achieving perfect exposure, with good detail in the highlights and shadows. Image by Jeff Smallwood.
Remember that exposure isn't just about shutter speed - it also depends on your aperture and ISO speed. A good technique is to choose a shutter speed which gives the desired amount of blurring (if any), and then adjust your aperture and ISO to give a good overall exposure.

Creative Effects

By using very short or very long shutter speeds, you can introduce some interesting creative effects into your shots.
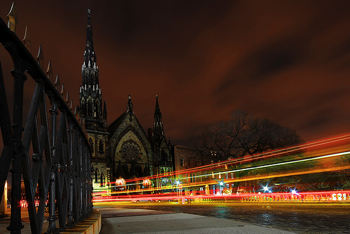
Long exposure photography is where you open the shutter for much longer than normal - anything from a few seconds to several minutes. This is perfect for creating blurred crowd shots, giving moving water a fog-like appearance, and capturing trails of light from things like cars and stars.
Long exposure photo of water
A very slow shutter speed can be used for interesting abstract effects such as making water appear misty and smooth. Image by Jim.
Alternatively, by using a very fast shutter speed you can capture some stunning "frozen" motion, such as birds in flight, sportsmen in action, or water splashing. These types of shots often require lots of trial and error, but they're truly fascinating when they work.
Exploding paint taken with a fast shutter speed
Use a very fast shutter speed to freeze motion. Image by Diego Diaz.
There's no end to the interesting effects you can create by varying your shutter speed. Don't be afraid to experiment or use settings that you'd normally avoid - you never know when you'll find a way to bring a new perspective to a common subject.
The best way to learn about shutter speed is to flick your camera into manual or shutter priority mode and play around. Pay attention to the effect on exposure and blurring, and see how you can use that knowledge to bring a new level of creativity to your photos.
Did you find this post helpful? If so, please spread the word by sharing it below.
THANKS TO : 
http://www.photographymad.com/

10 Top Photography Composition Rules

it may sound clichéd, but the only rule in photography is that there are no rules. However, there are are number of established composition guidelines which can be applied in almost any situation, to enhance the impact of a scene.
These guidelines will help you take more compelling photographs, lending them a natural balance, drawing attention to the important parts of the scene, or leading the viewer's eye through the image.
Once you are familiar with these composition tips, you'll be surprised at just how universal most of them are. You'll spot them everywhere, and you'll find it easy to see why some photos "work" while others feel like simple snapshots.

Rule of Thirds

Imagine that your image is divided into 9 equal segments by 2 vertical and 2 horizontal lines. Therule of thirds says that you should position the most important elements in your scene along these lines, or at the points where they intersect.
Doing so will add balance and interest to your photo. Some cameras even offer an option to superimpose a rule of thirds grid over the LCD screen, making it even easier to use.
Lighthouse with rule of thirds grid
Notice how the building and horizon are aligned along rule-of-thirds lines. Image by Trey Ratcliff.

Balancing Elements

Placing your main subject off-centre, as with the rule of thirds, creates a more interesting photo, but it can leave a void in the scene which can make it feel empty. You should balance the "weight" of your subject by including another object of lesser importance to fill the space.
Road sign with building behind
Here, the visual "weight" of the road sign is balanced by the building on the other side of the shot. Image by Shannon Kokoska.

Leading Lines

When we look at a photo our eye is naturally drawn along lines. By thinking about how you place lines in your composition, you can affect the way we view the image, pulling us into the picture, towards the subject, or on a journey "through" the scene. There are many different types of line - straight, diagonal, curvy, zigzag, radial etc - and each can be used to enhance our photo's composition.
Road winding through mountains
The road in this photo draws your eye through the scene. Image by Pierre Metivier.

Symmetry and Patterns

We are surrounded by symmetry and patterns, both natural and man-made., They can make for very eye-catching compositions, particularly in situations where they are not expected. Another great way to use them is to break the symmetry or pattern in some way, introducing tension and a focal point to the scene.
Chapel entrance
The symmetry of this chapel is broken by the bucket in the bottom right corner. Image by Fabio Montalto.

Viewpoint

Before photographing your subject, take time to think about where you will shoot it from. Our viewpoint has a massive impact on the composition of our photo, and as a result it can greatly affect the message that the shot conveys. Rather than just shooting from eye level, consider photographing from high above, down at ground level, from the side, from the back, from a long way away, from very close up, and so on.
Man sitting on beach photographed from above
The unusual viewpoint chosen here creates an intriguing and slightly abstract photo. Image byronsho.

Background

How many times have you taken what you thought would be a great shot, only to find that the final image lacks impact because the subject blends into a busy background? The human eye is excellent at distinguishing between different elements in a scene, whereas a camera has a tendency to flatten the foreground and background, and this can often ruin an otherwise great photo. Thankfully this problem is usually easy to overcome at the time of shooting - look around for a plain and unobtrusive background and compose your shot so that it doesn't distract or detract from the subject.
Female violinist
The plain background in this composition ensures nothing distracts from the subject. Image byPhilipp Naderer.

Depth

Because photography is a two-dimensional medium, we have to choose our composition carefully to conveys the sense of depth that was present in the actual scene. You can create depth in a photo by including objects in the foreground, middle ground and background. Another useful composition technique is overlapping, where you deliberately partially obscure one object with another. The human eye naturally recognises these layers and mentally separates them out, creating an image with more depth.
Sheep in field will misty hills in the background
Emphasise your scene's depth by including interesting subjects at varying distances from the camera. Image by Jule Berlin.

Framing

The world is full of objects which make perfect natural frames, such as trees, archways and holes. By placing these around the edge of the composition you help to isolate the main subject from the outside world. The result is a more focused image which draws your eye naturally to the main point of interest.
Lake framed by hills either side
Here, the surrounding hills form a natural frame, and the piece of wood provides a focal point. Image by Sally Crossthwaite.

Cropping

Often a photo will lack impact because the main subject is so small it becomes lost among the clutter of its surroundings. By cropping tight around the subject you eliminate the background "noise", ensuring the subject gets the viewer's undivided attention.
Ceramic ornaments of characters hugging
Cut out all unnecessary details to keep keep the viewer's attention focused on the subject. Image by Hien Nguyen.

Experimentation

With the dawn of the digital age in photography we no longer have to worry about film processing costs or running out of shots. As a result, experimenting with our photos' composition has become a real possibility; we can fire off tons of shots and delete the unwanted ones later at absolutely no extra cost. Take advantage of this fact and experiment with your composition - you never know whether an idea will work until you try it.
Lone tree in field illuminated with golden light
Digital photography allows us to experiment with different compositions until we find the perfect one. Image by Jule Berlin.
Composition in photography is far from a science, and as a result all of the "rules" above should be taken with a pinch of salt. If they don't work in your scene, ignore them; if you find a great composition that contradicts them, then go ahead and shoot it anyway. But they can often prove to be spot on, and are worth at least considering whenever you are out and about with your camera.
Did you find this post helpful? If so, please spread the word by sharing it below.

THANKS TO : 
http://www.photographymad.com/

Thursday, February 9, 2012

2012 untuk Bumi Kita


Berbicara mengenai tahun baru 2012, saya lebih tertarik mencermati berita yang beredar di luar. MencairnyaGletser Mount EverestGletser atau bongkahan es yang di prediksikan oleh para ahli akan terjadi di tahun ini ternyata sudah mencair sejak tahun lalu. Mungkin beberapa dari kita hanya mengetahui berita ini apabila muncul atau di bahas di laryar kaca. Oleh karena itu saya akan membantu mendapatkan kembali informasi ini. SukuMaya dari Yucatan sudah berani memprediksikan dengan kalender suku maya bahwa dunia akan kiamat pada tahun ini. Mungkin saya tidak bisa menggambarkan apa yang ada pada gambar di bawah. Tetapi memang beberapa kali suku Maya meramalkan sesuatu yang hampir semuanya terjadi. Jadi, apakah kita percaya? Kepercayaan sebenarnya bukanlah masalah yang ada di pembahasan kali ini. Yang terpenting adalah mengapa semua penduduk bumi tidak bisa menyelamatkan buminya? Tempat yang memberikan kenyamanan untuk mereka? Sudah kita ketahui penyebab utama kerusakan bumi adalah Global Warming atau pemanasan global yang terjadi. Mengapamount everest yang hancur dan mencair lebih cepat?
Seperti yang saya telusuri, banyak pabrik industri yang terletak di daerah asia dan berada di jalur-jalur khatulistiwa. Hampir 80% pusat pabrik industri berada di belahan yang sejajar dengan garis lintang mount everest. Dan 50%-nya adalah pabrik industri yang mngeluarkan gas dan zat-zat yang bisa menghancurkan atmosfir permukaan bumi secara perlahan. Dan apa yang bisa kita lakukan?
Menanam pohon adalah cara yang sudah di sarankan ke luruh penjuruh dunia. Jadi bantulah bumi kita dengan mengembalikan sedikit demi sedikit atmosfir yang terkelupas sedikit demi sedikit. Ayo bantu keluarga dan keturunan kita dengan cara ini agar bumi bisa selamat. 1 orang 1 pohon. Jadikan Indonesia hijau. Jaga bumi kita.